Next.jsのデフォルトページを読み解く
CSS勉強のため、Next.js起動時のデフォルトページを読み解いてみました。
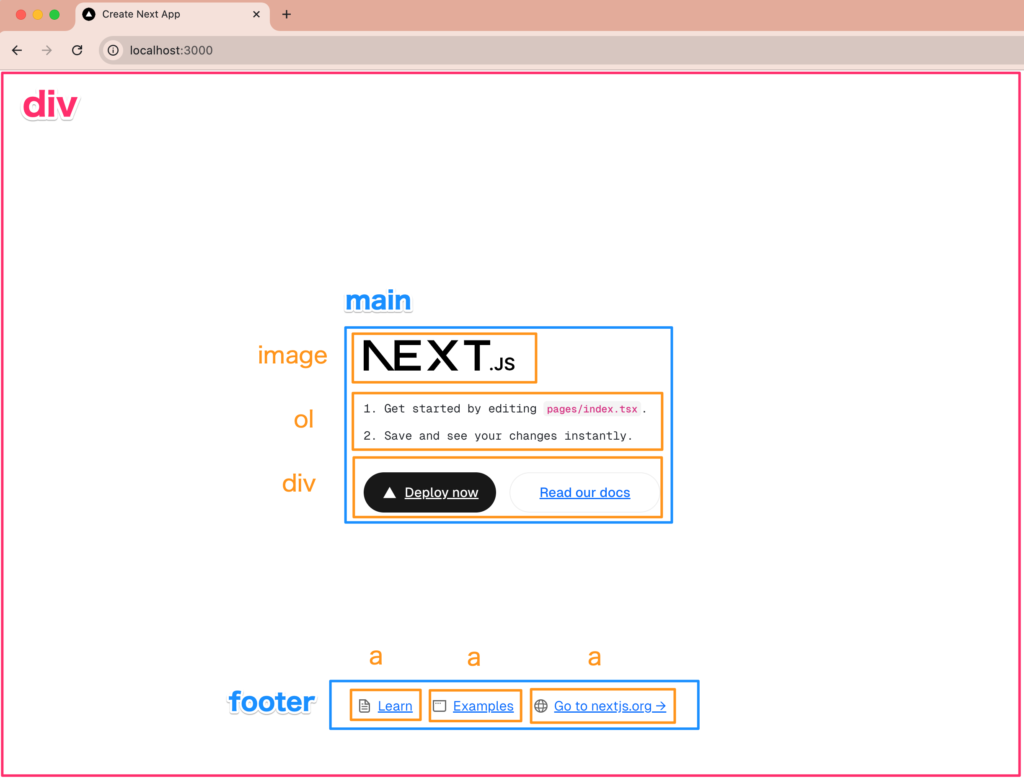
表示画面

必要なものをインポート・ローカルフォントの設定
pages/index.tsxを上から見ていきます。
import Head from "next/head";
import Image from "next/image";
import localFont from "next/font/local";
import styles from "@/styles/Home.module.css";

const geistSans = localFont({
  src: "./fonts/GeistVF.woff",
  variable: "--font-geist-sans",
  weight: "100 900",
});
const geistMono = localFont({
  src: "./fonts/GeistMonoVF.woff",
  variable: "--font-geist-mono",
  weight: "100 900",
});
<Head> タブのタイトル・ファビコン・メタデータ
export default function Home() {
  return (
    <>
      <Head>
        <title>Create Next App</title>
        <meta name="description" content="Generated by create next app" />
        <meta name="viewport" content="width=device-width, initial-scale=1" />
        <link rel="icon" href="/favicon.ico" />
      </Head>
<div> 全体の設定
- 薄いグレー部分の設定
- 黒いボタン(primary)と白いボタン(secondary)の設定
- div配下の要素を縦中心(justify-items)、横中心(align-items)に配置
- 画面四隅に80pxのpaddingを設ける
- グリッドレイアウトでpaddingの内側を横三分割(①20px, 64px余白, ②余ったエリア(main), 64px余白, ③20px(footer))
ここでグリッドの設定をしっかり行っているので、後々の設定は楽になっています。
<div className={`${styles.page} ${geistSans.variable} ${geistMono.variable}`} >
{/* Home_page__Yvcrx __variable_1e4310 __variable_c3aa02 */}
.Home_page__Yvcrx {
--gray-rgb: 0, 0, 0;
--gray-alpha-200: rgba(var(--gray-rgb), 0.08);
--gray-alpha-100: rgba(var(--gray-rgb), 0.05);
--button-primary-hover: #383838;
--button-secondary-hover: #f2f2f2;
display: grid;
grid-template-rows: 20px 1fr 20px;
align-items: center;
justify-items: center;
min-height: 100svh;
padding: 80px;
grid-gap: 64px;
gap: 64px;
font-family: var(--font-geist-sans);
}
.__variable_1e4310 {
--font-geist-sans: '__geistSans_1e4310', '__geistSans_Fallback_1e4310';
}
.__variable_c3aa02 {
--font-geist-mono: '__geistMono_c3aa02', '__geistMono_Fallback_c3aa02';
}<main>
- 配下の配置は縦並び(column)のflexbox
- 配下の要素同士は32px間隔を開ける
- 画面全体の配置はgrid-row-start: 2
<main className={styles.main}> {/* Home_main__VkIEL */}.Home_main__VkIEL {
display: flex;
flex-direction: column;
gap: 32px;
grid-row-start: 2;
}
<Image>
<Image
  className={styles.logo}
  src="https://nextjs.org/icons/next.svg"
  alt="Next.js logo"
  width={180}
  height={38}
  priority
/><img alt="Next.js logo" fetchpriority="high" width="180" height="38" decoding="async" data-nimg="1" class="Home_logo__IOQAX" style="color:transparent" src="https://nextjs.org/icons/next.svg">「fetchpriority=”high”」というのは「他の画像よりも優先度高めで画像取得して」という指示とのことです。
HTMLImageElement: fetchPriority プロパティ – Web API | MDN
<ol>
<ol>
  <li>
    Get started by editing <code>pages/index.tsx</code>.
  </li>
  <li>Save and see your changes instantly.</li>
</ol>
<div>
          <div className={styles.ctas}>
            <a
              className={styles.primary}
              href="https://vercel.com/new?utm_source=create-next-app&utm_medium=default-template&utm_campaign=create-next-app"
              target="_blank"
              rel="noopener noreferrer"
            >
              <Image
                className={styles.logo}
                src="https://nextjs.org/icons/vercel.svg"
                alt="Vercel logomark"
                width={20}
                height={20}
              />
              Deploy now
            </a>
            <a
              href="https://nextjs.org/docs?utm_source=create-next-app&utm_medium=default-template&utm_campaign=create-next-app"
              target="_blank"
              rel="noopener noreferrer"
              className={styles.secondary}
            >
              Read our docs
            </a>
          </div>
HTML出力結果
    <div class="Home_ctas__LOR2C">
      <a class="Home_primary__66jd8" href="https://vercel.com/new?utm_source=create-next-app&utm_medium=default-template&utm_campaign=create-next-app" target="_blank" rel="noopener noreferrer">
        <img alt="Vercel logomark" loading="lazy" width="20" height="20" decoding="async" data-nimg="1" class="Home_logo__IOQAX" style="color:transparent" src="https://nextjs.org/icons/vercel.svg">Deploy now
      </a>
      <a href="https://nextjs.org/docs?utm_source=create-next-app&utm_medium=default-template&utm_campaign=create-next-app" target="_blank" rel="noopener noreferrer" class="Home_secondary__p1_Og">Read our docs</a>
    </div>
「rel=”noopener”」は不要
「noopener」は「target=”_blank”」と同様、リンク先を別タブで開くという意味なので不要とのことです。
「noreferrer」は、「遷移先にリファラー情報を渡さない」という役割があるそうです。その必要があれば使っていいですが、サイト内リンクに付けると解析ができなくなるそうです。
別タブへのリンク記述「target=”_blank”とrel=”noopener noreferrer”」の見直しを
<footer>
- 画面全体での配置はgrid-row-start: 3
- 配下の要素は横並びのflexbox
- 配下の要素同士は24px間隔を空ける
<footer className={styles.footer}> {/* Home_footer__yFiaX */}Home_footer__yFiaX {
grid-row-start: 3;
display: flex;
gap: 24px;
}
<a>
          <a
            href="https://nextjs.org/learn?utm_source=create-next-app&utm_medium=default-template&utm_campaign=create-next-app"
            target="_blank"
            rel="noopener noreferrer"
          >
            <Image
              aria-hidden
              src="https://nextjs.org/icons/file.svg"
              alt="File icon"
              width={16}
              height={16}
            />
            Learn
          </a>
          //...Examples, Go to next.js.orgも大体同じ
読み上げ不要な要素には「aria-hidden=”true”」
- アイコンや画像などの純粋に装飾的なコンテンツ
- 繰り返されるコンテンツテキストなどの重複コンテンツ
- メニューのような、画面外または折りたたまれたコンテンツ
